Redistribution 전부 활용 실습
static - rip - ospf - eigrp로 연결 후 통신이 잘 되는가 확인

R0
en
conf t
no ip domain-lookup
int gig1/0
ip add 10.1.1.9 255.255.255.0
no shut
int gig2/0
ip add 20.1.1.9 255.255.255.0
no shut
int gig3/0
ip add 30.1.1.9 255.255.255.0
no shut
int gig4/0
ip add 40.1.1.9 255.255.255.0
no shut
exit
ip route 1.1.1.0 255.255.255.0 gig1/0
router rip
version 2
default-information originate
redistribute ospf 1 metric 5
redistribute eigrp 100 metric 5
redistribute static
network 20.1.1.0
router ospf 1
redistribute static subnets
redistribute rip subnets
redistribute eigrp 100 metric 10 subnets
default-information originate
network 30.1.1.9 0.0.0.0 area 0
router eigrp 100
redistribute static
redistribute rip metric 10000 10 255 1 1500
redistribute ospf 1 metric 10000 1000 255 1 1500
network 40.1.1.4 0.0.0.0
exit
exit
copy running-config startup-config
R1
en
conf t
hostname R1
no ip domain-lookup
int gig0/0
ip add 1.1.1.1 255.255.255.0
no shut
int gig0/1
ip add 10.1.1.1 255.255.255.0
no shut
exit
ip route 0.0.0.0 0.0.0.0 gig0/1
exit
copy running-config startup-config
R2
en
conf t
hostname R2
no ip domain-lookup
int gig0/0
ip add 2.2.2.1 255.255.255.0
no shut
int gig0/1
ip add 20.1.1.2 255.255.255.0
no shut
exit
router rip
version 2
no auto-summary
passive-interface gig0/0
network 2.2.2.0
network 20.1.1.0
exit
exit
copy running-config startup-config
R3
en
conf t
hostname R3
no ip domain-lookup
int gig0/0
ip add 3.3.3.1 255.255.255.0
no shut
int gig0/1
ip add 30.1.1.3 255.255.255.0
no shut
exit
router ospf 1
passive-interface gig0/0
network 3.3.3.1 0.0.0.0 area 0
network 30.1.1.3 0.0.0.0 area 0
exit
exit
copy running-config startup-config
R4
en
conf t
hostname R4
no ip domain-lookup
int gig0/0
ip add 4.4.4.1 255.255.255.0
no shut
int gig0/1
ip add 40.1.1.4 255.255.255.0
no shut
exit
router eigrp 100
no auto-summary
passive-interface gig0/0
network 4.4.4.1 0.0.0.0
network 40.1.1.4 0.0.0.0
exit
exit
copy running-config startup-config
리눅스 서버
FTP
• 대용량의 파일 전송 서비스에 적합(http가 사실 더 빠름..)
• 웹 서비스의 일부로 통합 운영되는 추세
• xinetd보다는 standalone 형태로 운영(xinetd와 standalone차이점 : 리스닝을 직접 하면 → standalone, 직접 안 하면 → xinetd)
• 시스템에 리소스를 많이 차지하는 서비스
• Out of band
• 21 : control connection - 연결할때
• 20 : data connection(Active mode) - 다운할 때(서버 쪽에서 커넥션을 먼저 요청한다.) 포트 고정.
- Passive mode : 임의의 포트를 이용 (1024 이후 것으로)- 클라이언트가 먼저 요청을 하는 거
접속 및 전송 과정
- FTP client는 21번 port를 통해서 서버와 control connection을 설정한다.- 처음에 접속요청을 하는 거
ㄴ 처음에 아이디, 비번 물어봄(get - 파일을 내 컴으로 다운로드하는 거, put - 내 파일을 서버에다가 올리는 거) - 이 제어연결을 통해 사용자 계정과 비밀번호를 전송한다.
- Client는 제어연결을 통해 원격지의 디렉터리 변경과 같은 명령을 전송한다.
- 서버 측은 제어연결을 통해 파일 전송을 위한 명령을 받으면 TCP data connection을 초기화한다.
- 하나의 파일 전송이 끝나면 data연결은 close 된다.
- 다음 파일 전송을 위해서는 새로운 TCP connection을 생성한다.
FTP는 소캣을 2개씩 연다. → 서비스가 리소스를 많이 먹는다.
겁나 쓰기가 어렵다. → 일반인 기준.(엔지니어가 많이 사용함,)
FTP 사용
달 서버에 접속해서 get, put을 사용해서 파일 전송, 다운하기
달서버의 ftp서버에 접속을 합니다.

ftp가 없다면 먼저 다운로드해줍니다.
yum -y install ftp

get을 사용해서 파일을 다운해 줍니다.
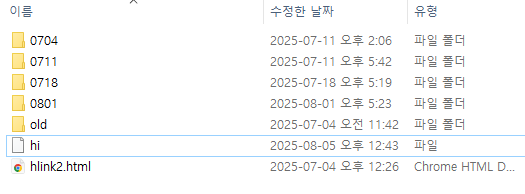
ftp를 접속했던 디렉터리에 파일이 다운로드됩니다.
공백이 있을 경우 " "을 사용합니다.
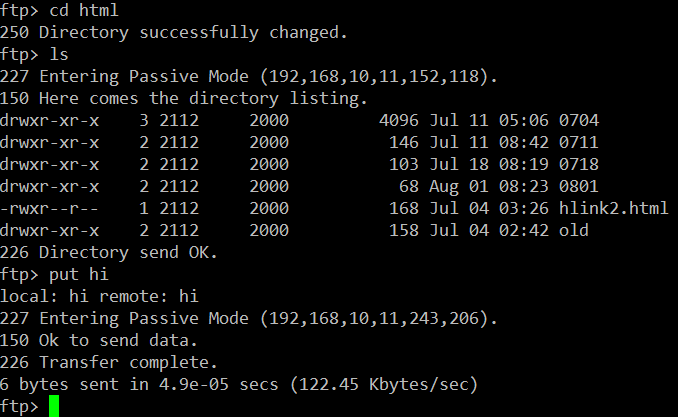
내 컴퓨터에 있는 파일을 다운로드할 땐 put을 사용합니다.
파일이 있는 디렉터리에서 접속 후 put을 해야 잘 전송이 됩니다.
vsftp 설치
패키지 확인
# dnf list vsftpd
설치
# dnf install -y vsftpd
실행
# systemctl start vsftpd.service
# systemctl enable vsftpd.service -> 리부트해도 다시 실행되게 하려고 하는 거(enable 해야 함.)
관련 파일
• 데몬 : /usr/sbin/vsftpd
• 설정 파일 : /etc/vsftpd/vsftpd.conf
• PAM 모듈 : /etc/pam.d/vsftpd → 사용자계정 컨트롤 할 수 있는 곳
• 접근 제한 파일 : /etc/vsftpd/ftpusers /etc/vsftpd/user_list
ㄴ vsftpd가 원래 가지는 유저리스트(기본값은 등록된 사람만 못 들어가게 함. )
Active, Passive mode(서버 관점에서 봐야 함)
Active mode(액티브 모드) - 초기모드(서버가 클라에게 접속요청 보냄)
클라이언트가 데이터를 수신받을 임의의 포트를 서버에 알려주면 서버는 20번 포트를 통해 클라이 언트에게 데이터를 전송함
• Client에서 Server로 FTP 제어 연결 요청 : active
• Client에서 자신의 Data 전송 Port(Random Port)를 Server에 전송
• Server에서 Client로 Data 전송 연결 요청
Passive mode(패시브 모드) - (클라가 서버로 접속요청 보냄, 사용하는 포트의 번호를 최대한 줄여야 함.)
서버가 데이터를 송신할 임의의 포트를 클라이언트에 알려주어 클라이언트가 서버의 임의의 포트에 접 속하여 데이터를 가져감
• Client에서 Server로 FTP 제어 연결 : passive
• Server에서 자신의 Data 전송 Port(Random Port)를 Client에 전송
• Client에서 Server로 Data 전송 연결 요청
실습
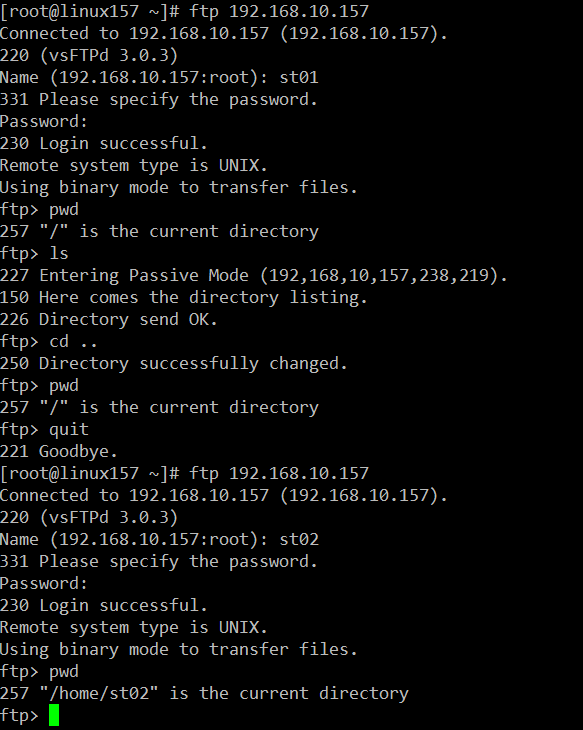
192.168.10.157 서버에 vsftpd를 다운했으니까 그룹을 만들고 사용자를 만들어서 접속해기
그룹 : st - 6000
사용자 : st01 - 6001, st02 - 6002, st03 - 6003
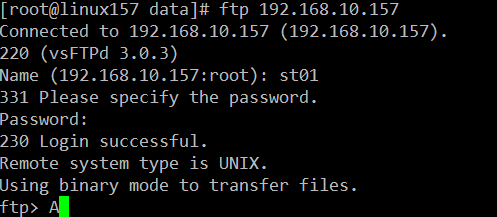
# ftp 192.168.10.157로 접속하기.
/etc/vsftpd/vsftpd.conf 에서 설정
접속 제한 설정
#max_clients=30
#max_per_ip=3 (0은 무제한)
#ls_recurse_enable=YES (ls -R 명령은 부하가 크다)
익명 사용자 관련 설정 → 지금은 사용 안 함.
anonymous_enable=YES ← NO (anonymous = 불특정 다수)
#anon_upload_enable=YES (d:NO)
#anon_mkdir_write_enable=YES (d:NO)
#deny_email_enable=YES (d:NO banned_email_file )
- banned_email_file 파일에 지정된 메일 계정은 접속이 불허된다.
#non_anon_password=NO
#anon_root=/var/ftp (d:/var/ftp)
#ftp_username=ftp (d:ftp)
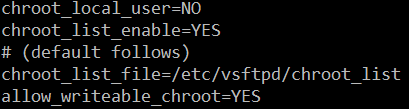
chroot 설정
#chroot_list_enable=YES
- chroot_local_user가 NO일 때 chroot_list_file에 지정된 사용자만 chroot를 적용한다.
- chroot_local_user가 YES일 때 chroot_list_file에 지정된사용자만 chroot를 적용하지 않는다.
#chroot_local_user=YES (d:No)
#chroot_list_file=/etc/vsftpd/chroot_list
- Default 값 : /etc/vsftpd/chroot_list
#allow_writeable_chroot=YES ← chroot 적용 시 반드시 추가필요, 접속이 불가하다.
• chroot 설정은 외부 디렉터리로 연결된 link 디렉터리에 접근도 금지된다. 이때는 mount 명령을 이용한다.
mount --bind [원본 디렉터리] [연결할 디렉토리]
실습
ㄴ /etc/vsftpd/vsftpd.conf 에서 설정
1. chroot_list_file에 등록되지 않은 사람만 chroot 적용
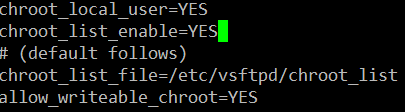
chroot_local_user=YES
chroot_list_enable=YES
chroot_list_file=/etc/vsftpd/chroot_list
allow_writeable_chroot=YES
cd /etc/vsftpd 에서 chroot_list파일을 만들기
chroot_list → st01 넣어주기.
st01 제외 다른 사용자들은 chroot가 적용이 된다.
/로 나오지만 사실은 /home/st02, st03 안에 있는 것이다.

2. chroot_list_file에 등록된 사람만 chroot 적용
chroot_local_user=NO
chroot_list_enable=YES
chroot_list_file=/etc/vsftpd/chroot_list
allow_writeable_chroot=YES
chroot_list파일에 st01이 입력되어 있기 때문에 st01만 chroot가 적용이 됩니다. 그래서 st01만 /로 나온다.
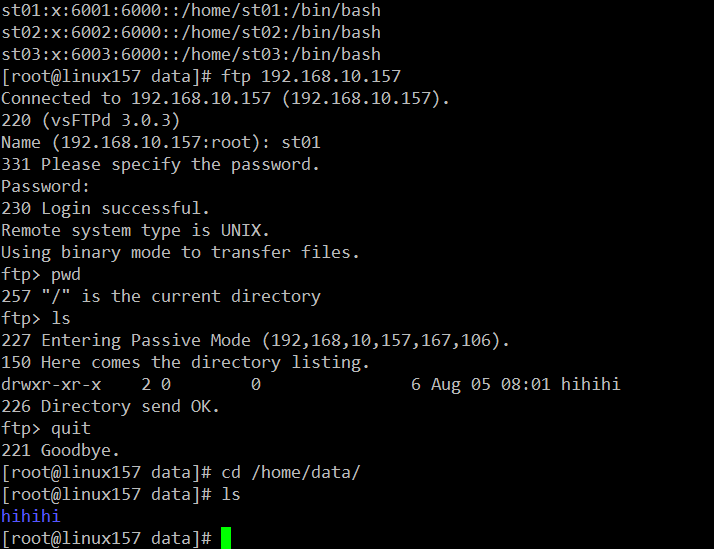
3. st01에 chroot가 적용되는 경우 /home/data에 접근 가능하도록 설정
chroot_local_user=NO
chroot_list_enable=YES
chroot_list_file=/etc/vsftpd/chroot_list
allow_writeable_chroot=YES
mount --bind /home/data /home/st01를 사용해서 홈 디렉터리는 /home/st01이지만 /home/data에 접근한 것이 됩니다.
standalone 인 경우만 사용되는 항목
listen=YES
- listen_ipv6=YES인 경우 listen은 사용되지 않음으로 NO로 설정된다.
- listen_ipv6의 설정에 포함되어 있다.
listen은 ipv4 만 듣는 거
더블스택 - ipv4로 들어와도 액세스가 가능하다
tcp_wrappers=YES → 현재는 지원하지 않습니다.ㅠㅠ
- /etc/hosts.deny, /etc/hosts.allow 파일에 정의
- hosts.allow 파일의 보안 등급이 높다.
- vsftpd : 192.168.11.11, 192.168.10.
• 마지막에 .은 패턴을 지정한다.
ㄴ ip로 ftp를 통제하는 기능
등록된 사용자(/etc/passwd) 관련 설정
local_enable=YES
write_enable=YES
local_umask=022
'kh교육' 카테고리의 다른 글
| (20250807031)DNS서버, 키분배,해쉬함수 (1) | 2025.08.07 |
|---|---|
| (20250806030)vsftp 사용자 계정 제한 설정,DNS (7) | 2025.08.06 |
| (20250804028)router-redistribute, 암호학 (3) | 2025.08.04 |
| (20250801027)eigrp,암호학,php (3) | 2025.08.02 |
| (20250731026)Redistribution&암호학 (2) | 2025.08.01 |